As a rule, we avoid printing from Illustrator. For whatever reason, Adobe did not endow it with a high quality print engine. On many occasions we've seen customers unable to get good quality prints when printing from Illustrator with and without a profile.
If you have Illustrator, you have Photoshop, which is the best option for printing to an inkjet printer.
Our recommendation is to export your Illustrator file to a PDF - in the RGB color space - and print it from Photoshop.
Since you're still reading...here is the process for printing with a color profile in Adobe Illustrator and Windows. It covers Canon and Epson printers.
NOTE YOUR FILE MUST BE IN THE RGB COLOR SPACE - Printing files in the CMYK color space yield poor results.
Illustrator Setup

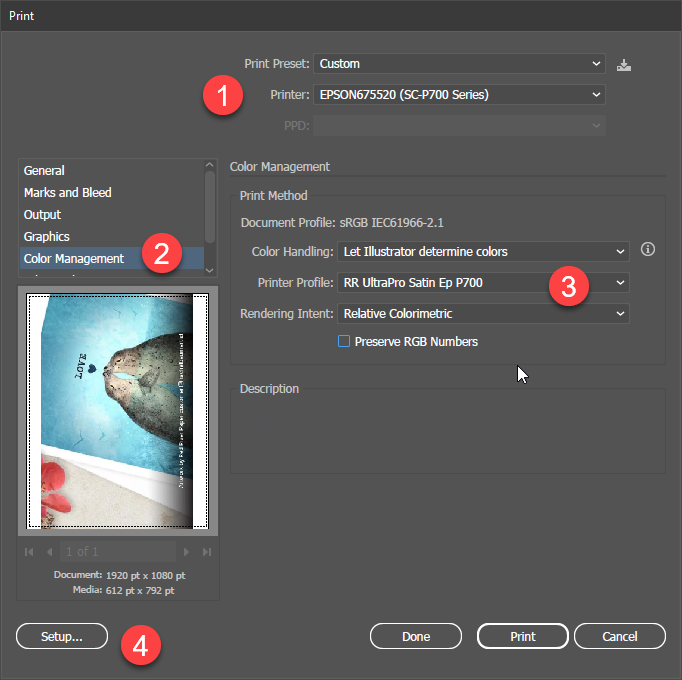
1 - Select your printer
2 - Click the Color Management option
3 - Set the Color Management dialog
Color Handling: Let Illustrator determine colors
Printer Profile: Choose the profile for your paper and printer
Rendering Intent: Your options for inkjet printing are Relative Colorimetric and Perceptual. Most choose Relative. Hover your mouse over the words
"Rendering Intent" for a brief description of the setting.
Preserve RGB Numbers: As a rule you'll leave this unchecked
4 - Click the Setup button to access your printer preferences, also called the driver dialog.
Epson Printer Setup

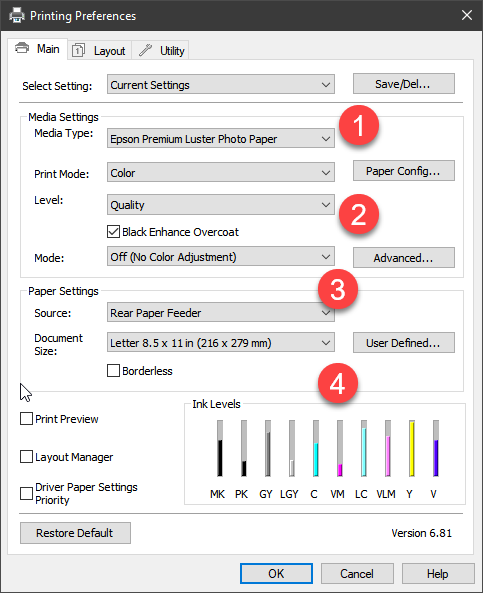
1 - Media Type: Set according to the recommendation in the profile instructions PDF that comes with each Red River Paper profile download.
You will NOT see Red River Paper product names here **
2 - Level: Choose the print quality you desire
3 - Mode: Off (No Color Adjustment)
4 - Paper Settings: Choose the source and paper size for your job
** Users of Epson Media Files with select SureColor printers will see RRP product names in the Media Type dropdown.
Click OK then click Print.
Canon Printer Setup

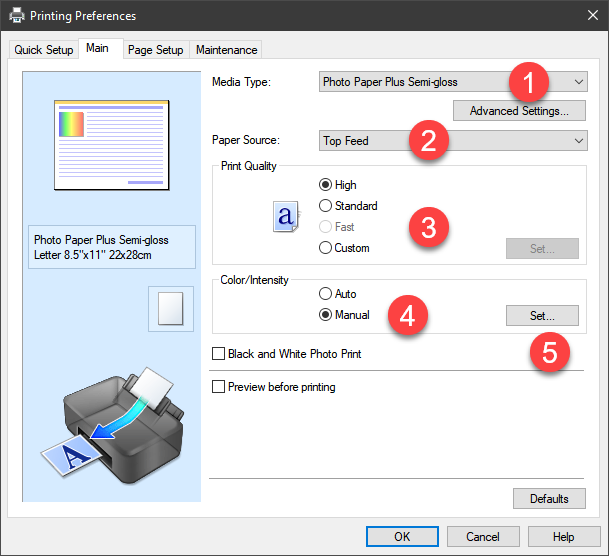
1 - Media Type: Set according to the recommendation in the profile instructions PDF that comes with each Red River Paper profile download
2 - Paper Source: Set it based on where you feed paper into the printer
3 - Print Quality: We recommend High for all print jobs
4 - Color Intensity: Select Manual
5 - Color Intensity: Click the Set button

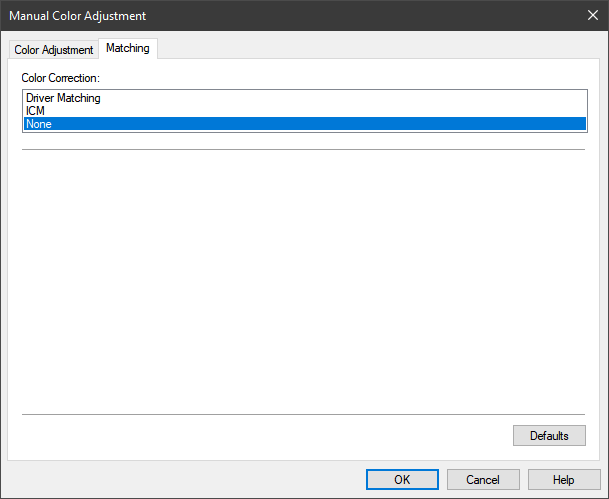
On the Manual Color Adjustment dialog
Click the Matching tab
Color Correction: None
Click OK and then click Print
Related Posts and Information
Last updated: February 18, 2023


