Get an in-depth view at the Windows driver and controls for the Canon PRO-1100.
Note that we recommend printing through the free Canon Professional Print and Layout application, which bypasses the printer driver completely and greatly simplifies the process of printing photos and artwork on the Pro-1100. It includes a setup program to install it as a plugin for Photoshop and Lightroom as well its stand-alone program version.
You can download Canon Professional Print and Layout here: https://www.usa.canon.com/support/p/imageprograf-pro-1100?sr...
If you are printing directly through another program, such as Photoshop, Lightroom, Affinity Photo, etc. then you will want to familiarize yourself with the layout of the Printing Preferences options for this printer.
Printing options we recommend you set before using the PRO-1100, and are important to a smooth and confusion free printing experience are marked with this [Key Control] icon

Basic Settings
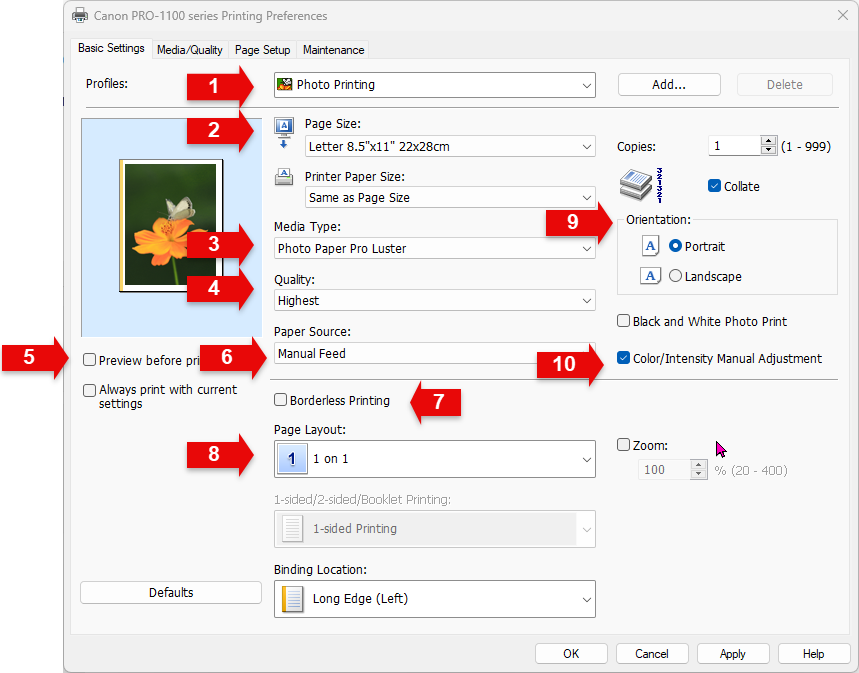
As the name implies, the Basic Settings tab allows for rapid selection of a lot of options - some more commonly used than others.
Once you become familiar with the important settings on the main and page setup tabs, the Basic Settings tab is likely to become your primary choice when printing.
1. Profiles - let you you save setups you use often. When you click Save and name the preset, it will remember all of the settings below.
2. Page Size and Printer Paper Size - Page Size is the size of the image or page as defined in your image editing or document editing software. Printer Paper Size is the size of the physical paper inserted into the printer.
Normally these will be the same, but - for example - if you are printing an 8x10 image onto 8.5x11 paper then you would set the Page Size to 8x10 and Printer Paper Size to 8.5x11. If Printer Paper Size is grayed out, it means that you have Borderless Printing turned on (see #7 below).
The categories are just common sizes of the types specified. Choose Document->Letter is the same quality output as choosing a size in the Photo category.
Under normal circumstances, don't choose a size option that says "Margin 25" in the name unless you plan on leaving very big margins around your image.
3. Media Type - tells the printer the type of paper you are using. This setting primarily affects things like the print head height, how quickly it can lay down ink, how much force it uses to pull the paper through the printer, etc.
By default, it will contain only Canon branded media. You can either use these built-in Canon media types following the guide in the PDF included in our ICC profile zip file located here: https://www.redrivercatalog.com/profiles/color-profiles-for-...
or you can install our custom Media Types (am1x files) into the printer following the guide linked to in the above PDF. If your custom-installed media types don't show up in this list, choose the Maintenance tab, click Update Media Information, then when it is done updating close and re-open the Printing Preferences window.
4. Quality - sets the output ink density. Higher values will use more ink and produce a bolder image, lower will use less ink and will lighter.
5. Preview Before Printing - leave this off as it can sometimes cause issues with color-management.
6. Paper source - controls the paper feed path. The different feeds each have a couple names used interchangeably.
There is the Top Feed - on the top of the printer, which can take multiple sheets of paper at once. It is sometimes called the Front Feed or ADF (Auto Document Feeder). The top feed is intended for lighter-weight papers, though some heavier-weight papers will work as well.
There is also the Manual Feed which is located on the rear of the printer and is sometimes also called the Rear Feed. This one can only take one sheet at a time. The rear feed is intended for heavier-weight papers but has a minimum paper size of 8" x 10".
7. Borderless Printing - allows the printer to print all the way to the edges of the paper. Note that this is only available for certain built-in sizes - it is not possible to do borderless printing on custom sizes. If you find that your borderless prints are not going quite all the way to the edge, see the Page Setup tab instructions below.
8. Page Layout - this is primarily used when printing things like slide decks and you want to print more than one slide per page. Binding Location will enforce additional margins.
9. Orientation - refers to the orientation of the image on your paper. Portrait is vertical while landscape is horizontal.
10. Color/Intensity Manual Adjustment - If printing using ICC color correction profiles, you will want this turned on. You can download our ICC color correction profiles here: https://www.redrivercatalog.com/profiles/color-profiles-for-...
Black and White Photo Print - This can be used to print using only the black and gray inks. More info on this below.
Media / Quality Tab
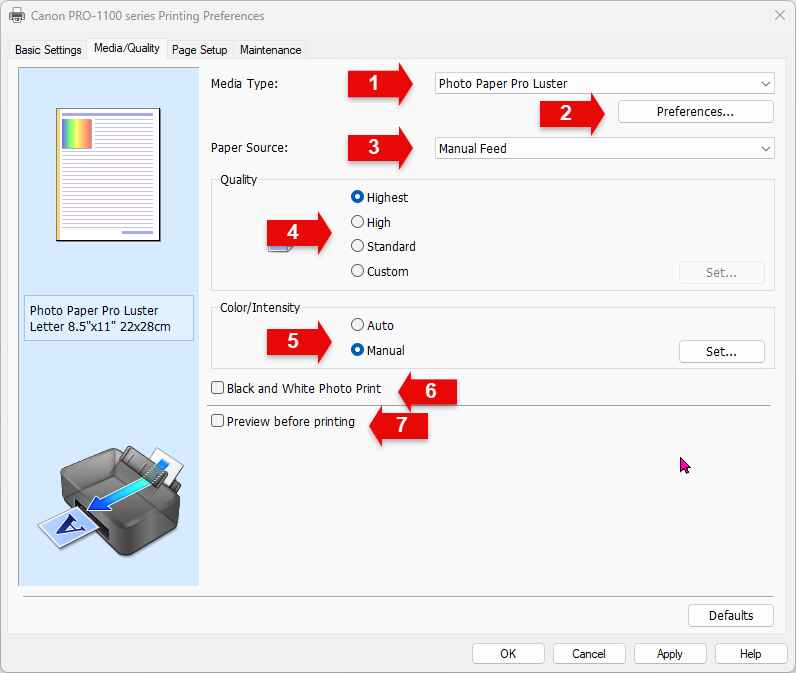

1. Media Type - a top three most important setting. It tells the printer important information and acts as part color profile, part ink throttle, and controls which black (photo or matte) is used. Always double check this setting before beginning a print.
The Media Type options are by default Canon branded papers. You will find the recommended setting in every box of Red River Paper brand inkjet media as well as in the PDF file included in the ICC color profile download for this printer, which you can find here: https://www.redrivercatalog.com/profiles/color-profiles-for-...
If you have installed our custom Media Types for this printer (am1x files), then Red River papers will also appear in this list. See our discussion on AM1X files and the Media Configuration Tool.
2. Preferences - This has various settings for working around and diagnosing problems. More info on these settings below.
3. Paper Source

Paper source controls the paper feed path. The Canon PRO-1100 has two. The Rear Tray is the top auto-load tray that can handle between 1-50 sheets depending on paper thickness. It is intended for papers between 4 mil and 14 mil thickness.
The Manual Feed is a single sheet path located on the back of the printer. This path can accept papers from 4 mil up to 24 mil thickness.
4. Quality - This controls how many droplets of ink per square inch are applied to the page. The higher the quality, the denser the ink, and the bolder the print. Lower quality settings will look more 'washed out' compared to higher quality settings. For the highest possible quality, choose Custom and move the slider to '1'. Note that Canon uses the terms "High" and "Fine" interchangeably in their quality settings.
When printing photos and artwork, we recommend the "High" print quality option for most cases as this is a good balance of quality and ink usage - but certainly experiment with higher quality settings, especially if you are marketing your prints as being of highest possible quality or marketing their longevity.
5. Color / Intensity

Color / Intensity controls the printer's color management software.
In Auto mode, the printer manages color output based on the Media Type you have selected. If you are using our ICC color profiles, you will normally want to set this to Manual mode so that you can turn off the printer's automatic color management.
The Manual option, followed by clicking Set, brings up the Manual Color Adjustment window.
The Manual Color Adjustment window contains three tabs.
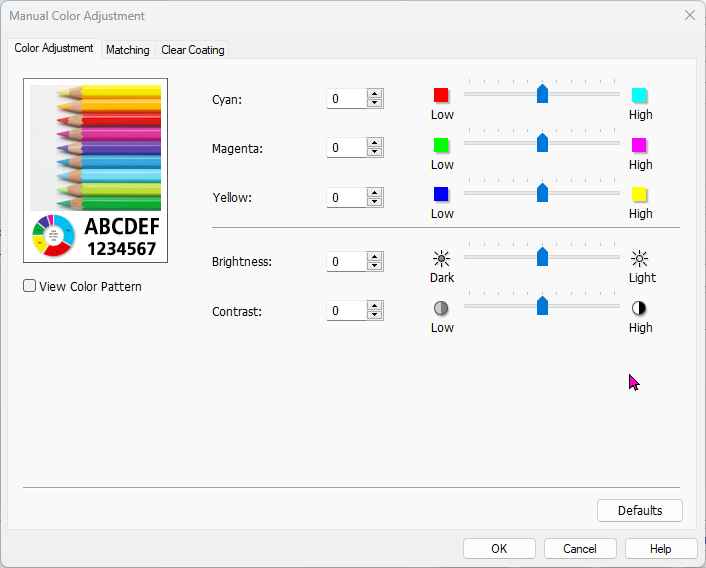
Color Adjustment allows for basic changes to hue, brightness, and contrast. The controls show you which color you are adding or subtracting with each slider.
Its not very common to use these Color Adjustment controls. Typically people will make these sorts of adjustments in their image editing software - but if you notice that all of your prints are coming out too dark, too blue, etc. then you may wish to set an adjustment here and save your settings as a Profile on the Basic Settings (main) tab.
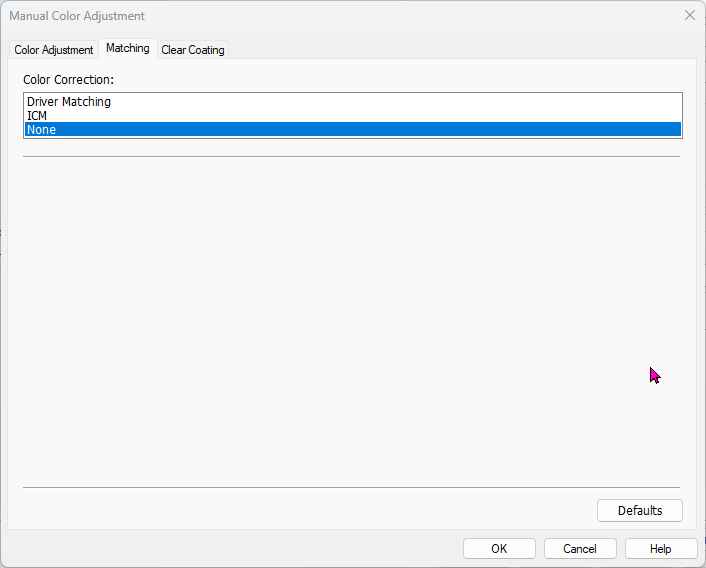

The Matching tab is a key control if you use our ICC color profiles. The color correction option, set to None, turns the printer's automatic color management system off so your application (Photoshop, Lightroom, etc) can use our ICC color profile to control the output.
People often think that ICC color profiles are sent to the printer, but this isn't the case. They are used by the printing software on the computer to translate the colors into pre-color-corrected printing data for the specific printer. If the printer's automatic color correction isn't turned off, this can result in something called "double profiling" where the computer is expecting the printer to print exactly what its given, but the printer applies its own automatic corrections anyway. This can result in prints that have a magenta or blue cast or otherwise very-off colors.
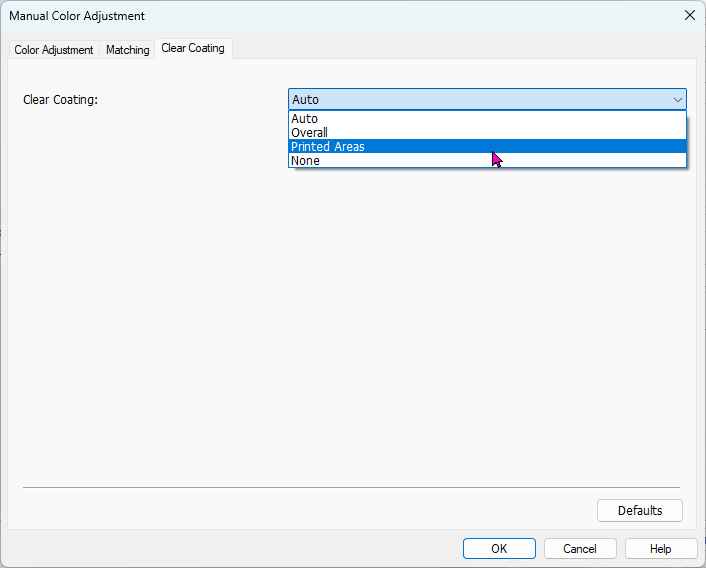
Clear Coating refers to the printer's Chroma Optimizer (CO) system. It is the clear ink sprayed onto papers with any reflective property. Examples are UltraPro Satin, Polar Gloss Metallic, and Palo Duro Softgloss Rag. This helps reduce difference in reflectance of printed and non-printed areas (called 'gloss differential') and is a major benefit of this printer. Chroma Optimizer can also help reduce scratches and helps make blacks deeper and colors more saturated.
Setting this to Auto, the printer will try to guess the areas which will need Chroma Optimizer based on the ink density. This can still result in some gloss differential on some papers. Matte papers will typically have "Auto" as the only option.
Setting this to Overall will put a layer of Chroma Optimizer over the entire page area.
Printed Areas will limit the Chroma Optimizer to area of the page covered by your images (note that if you have white margins/borders or other whitespace included in your image files, this will put Chroma Optimizer over these areas as well). This is what we typically recommend for media that supports it as it provides a good balance between ink usage and the benefits provided by Chroma Optimizer.
None wont put any Chroma Optimizer on the print. This is a good option for casual printing where you may want to save on total ink costs.
Note that our ICC color profiles are optimized for the Printed Areas or Overall setting for non-matte papers, and optimized for Auto for matte papers.
Black and White Photo Print
Going briefly back to the Media/Quality tab in the main Printing Preferences window...

With the Black & White Photo Print option checked, the Manual Color Adjustment window changes to control the PRO-1100's black & white print system.
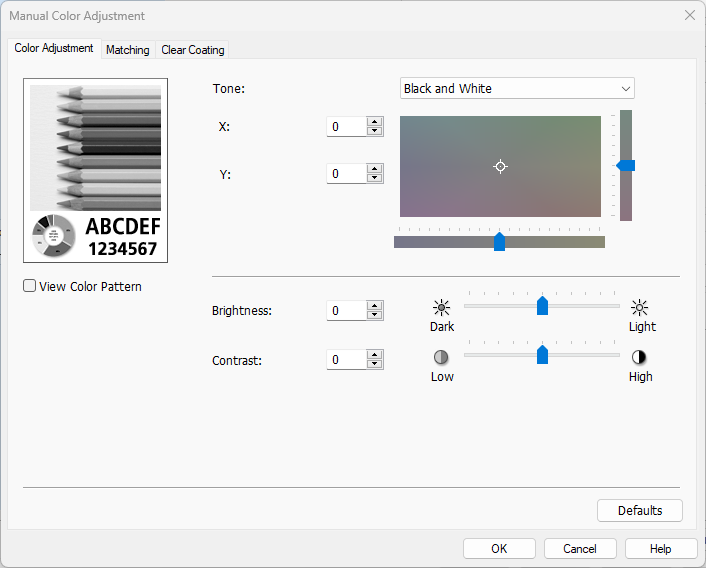
The Tone drop-down menu contains three presets. The default Black and White option is for neutral tone. Cool and Warm are available for selenium and sepia output, respectively. The X/Y coordinate feature is complex and allows for fine control over tonality. Since there is no way to accurately preview the changes, trial and error are required to obtain specific results.
Preferences Settings on the Media / Quality Tab
going back to the main Printing Preferences window, on the Media / Quality tab - when clicking the Preferences button, we get the following advanced settings
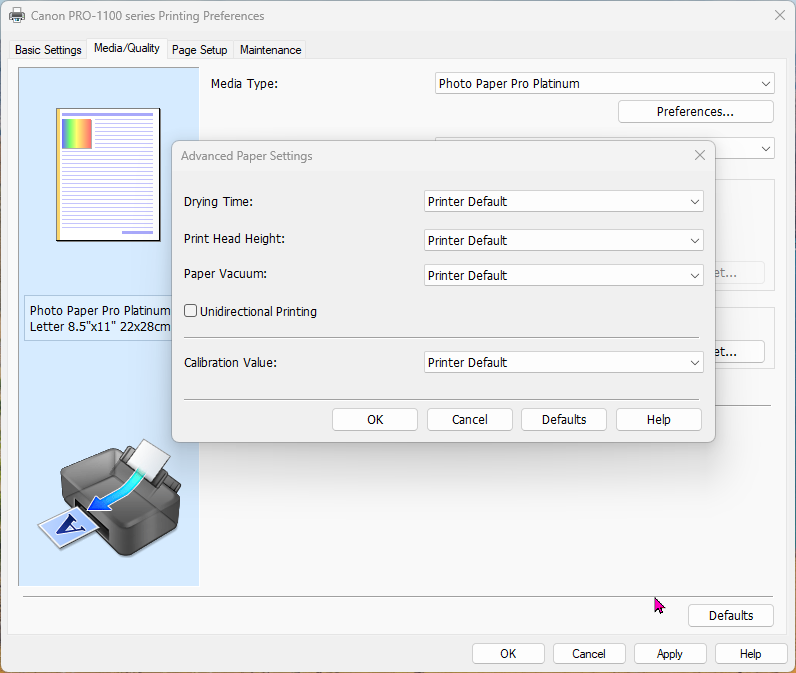
Drying Time is the amount of time the printer will leave one page to dry before printing the next one. If printing on vinyl or another media that can smear if not fully dry, then you may wish to set this to 1-5 minutes. Under normal circumstances, however, leaving this at Printer Default is recommended.
Paper Vacuum is on by default and it is recommended you leave it as such. Only for certain very, very thin media would you want to turn this off.
Unidirectional printing is rarely needed on Canon printers. When activated it applies ink only when the print head is travelling one direction. On some older models of printers, and other brands, Unidirectional Printing can increase print quality, at the cost of slower printing. Our testing on recent Canon imagePROGRAF printers, however, indicate that this setting does not increase quality but only increases printing time. So under normal circumstances you will want to leave this off.


Print Head Height is one of those key controls you need to understand. It is the printer's thick paper setting, referred to by Canon as Prevent Paper Abrasion. Activate this option if you notice "head strikes" or places where the print head is hitting against the paper, leaving ink smears or abrasion marks.
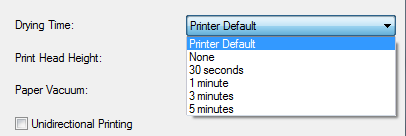
Drying time can be extended if you print on papers that are not "instant dry". They are rare and include plastics with little coating, sticker material, and others.

Leave the Print before preview option UNCHECKED. It can interfere with the color management process if you use paper / printer profiles.
Page Setup Tab
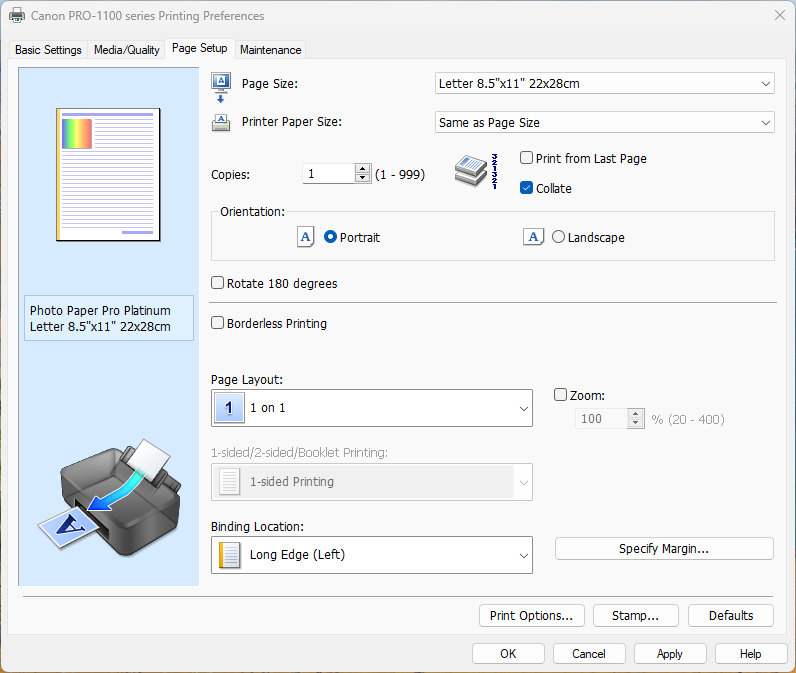

The most important control here is Page Size, which is the same as paper size in most situations. It is a key control that must be set before every print job.

Orientation refers to how the image orients to the paper. Portrait is vertical and Landscape is horizontal.

The PRO-1100 can print a number of sizes without borders. To activate the system, click "Borderless Printing" in the page layout section, see below.
If you make a borderless print and ink does not extend fully to the border, increase the Amount of Extension, see above.
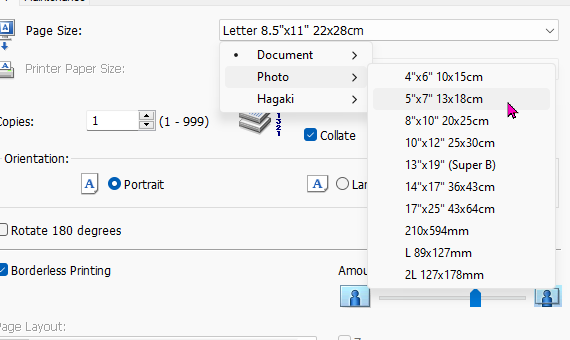
Once the borderless option is selected, the Page Size menu updates to show sizes that can be printed without borders.
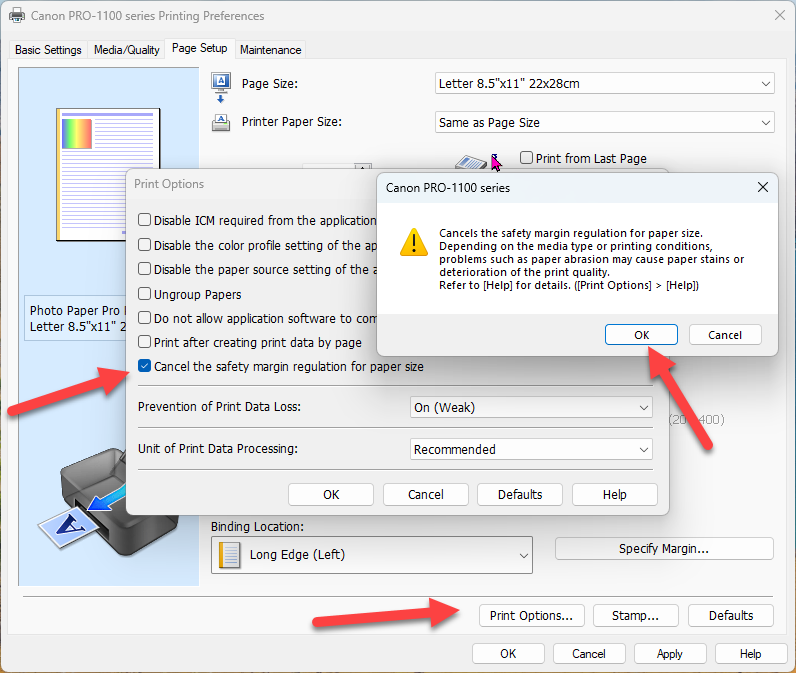
The Print Options button is near the bottom of the of the Page Setup. Below we cover the important available features.
Cancel safety margins is another key control you should set now. It allows you to use the Matte Photo Paper and Photo Paper Pro Premium Matte settings with all paper sizes and the borderless option. Without it being active, you could not use papers like Polar Matte, Premium Matte, River Linen, and Aurora Art without having very large margins.

The maintenance tab contains a number of important systems and features.
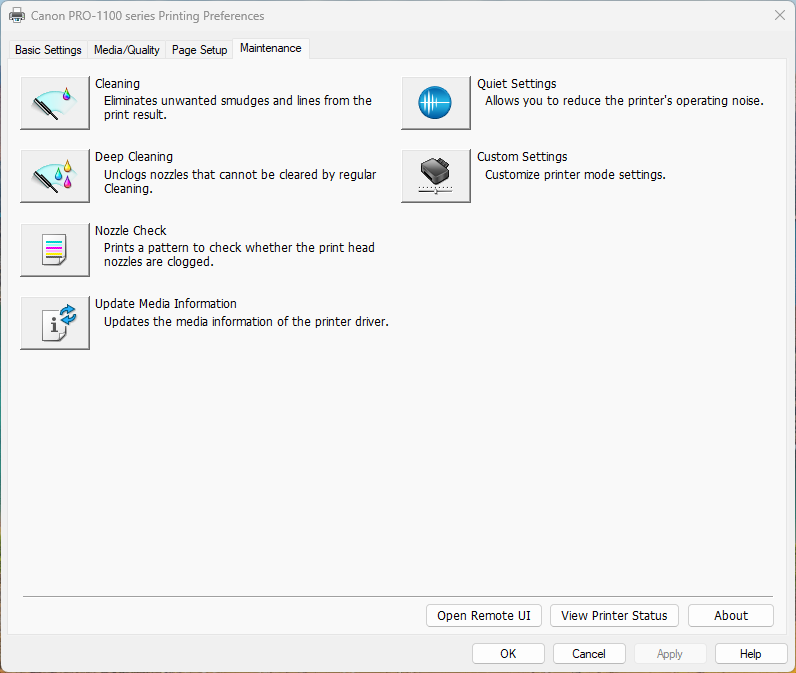
Cleaning Options
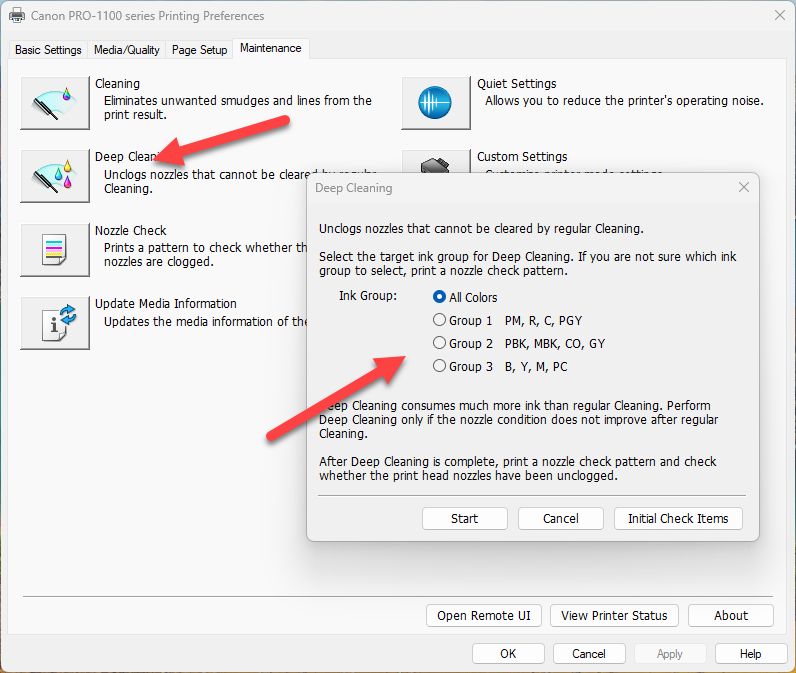
Three levels of nozzle cleaning are available - Clean, Deep Clean, System Cleaning. For the most part you will not use any of the three on a PRO-1100. Part of its magic is a continuous head clean routine when the printer is turned on and off. Start with the "Cleaning" option if you encounter any blocked nozzels. They are the first suspect if you notice a drop in print quality - white lines or color shifts. They are confirmed by running a Nozzle Check, which is also started from the maintenance tab.
Some people will recommend printing regular nozzle checks, however under most conditions, as long as you leave your printer turned on and in automatic sleep mode, the printer will take care of its own cleaning on a regular basis and printing regular nozzle checks ends up just wasting more ink and time. Some other brands or models of printers don't have the same automatic cleaning features, but this one will pretty much keep itself ready-to-print at all times as long as its not powered completely off. Cleaning cycles do use a small amount of ink.
A big plus is the Ink Group cleaning feature. Most printers force cleaning of all ink channels at once, which uses a good deal of ink. The PRO-1100 allows you to choose a single channel of four inks for cleaning to save time and ink dollars.
Custom settings

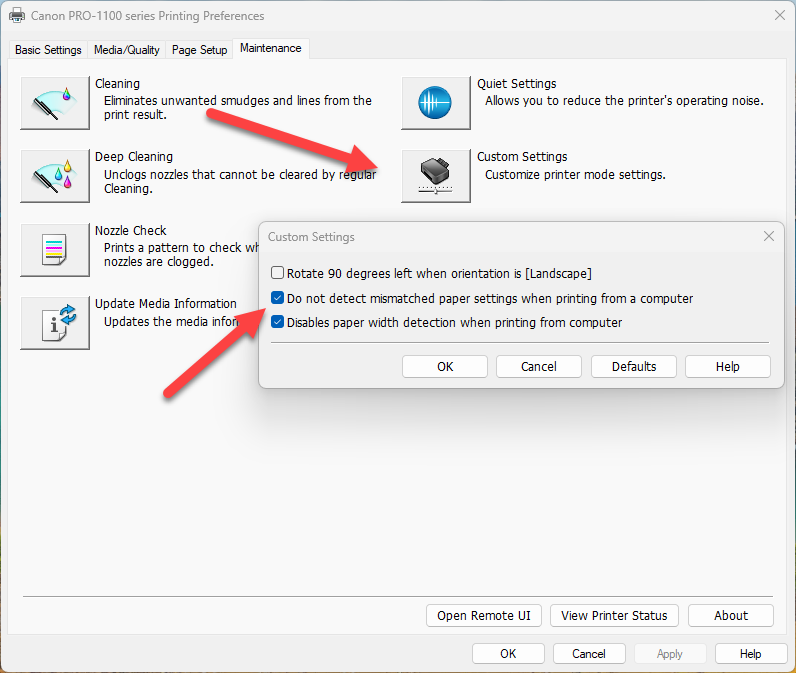
Here we find the last two key controls for your PRO-1100 setup. Both shut down sensors and software that cause a good deal of trouble for users. Both systems, designed to prevent you from making paper size or media setting mistakes, often do no more than stop your workflow with warnings and alerts that are difficult to understand and correct. A caveat here is that with these systems disabled, you need to verify a) you know the size paper you have and set it properly and b) understand what media setting is recommended for the paper you are using. Both are knowledge you should work to posses if you are going to own and operate a printer like the PRO-1100.
Update Media Information
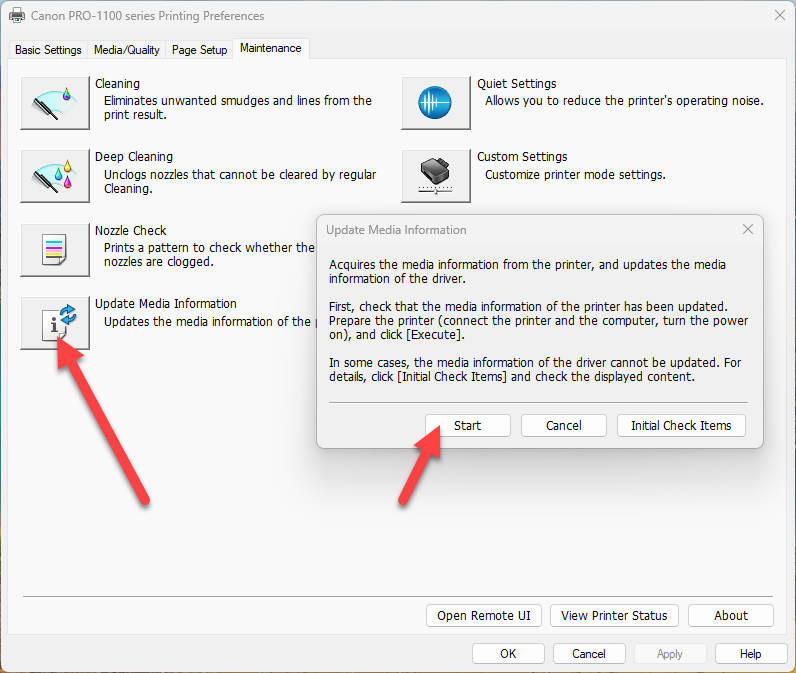
This setting is used when you are using customer media types (am1x files) with your printer. We have more info on these here: https://www.redrivercatalog.com/profiles/how-to-install-cano...
If you have added customer media types (am1x files) to your printer, you will need to click Update Media Information here after doing so to make sure the printer driver knows about the new media types. Canon Media Configuration Tool doesn't automatically update the print driver when installing new types, so this button goes back to the printer and asks it for an updated list of all installed media types. After doing this update, you will need to close and re-open the Printing Preferences window to have the new media types show up in the various dropdown lists.
Further Reading
Manual for the Canon Pro-1100: https://gdlp01.c-wss.com/gds/7/0300050057/01/PRO-1100_PRO-51...
Manual for Canon Accounting Manager: https://gdlp01.c-wss.com/gds/0/0300024330/05/AccountingManag...
Manual for Canon Media Configuration Tool: https://gdlp01.c-wss.com/gds/7/0300024277/08/MediaConfigurat...
Manual for Canon Professional Print and Layout: https://ij.manual.canon/ij/webmanual/ProfessionalPrintLayout...
About Red River Paper
Inkjet paper from inkjet paper experts. Red River was founded in 1997 and has over 40 years experience in fine papers. We hand pick fine paper from mills around the world and bring them to our plant in Dallas, Texas. From here, we convert the paper to various sheet sizes and rolls, as well as add special features available only from Red River. We offer wholesale direct pricing, and the convenience of over 30 different inkjet papers under one roof. Red River Paper invests the time and money to understand and test the latest inkjet technology from Epson, Canon, HP, Lexmark and others so you do not have too. Our client services representatives are well versed in our products and inkjet printing, and can give our clients helpful advice on which Red River papers will suit their needs.
Last updated: December 06, 2024


