Fuse Your Photos to Stone and Tile for Unique Gifts and Stunning Displays
By Christine Pentecost–

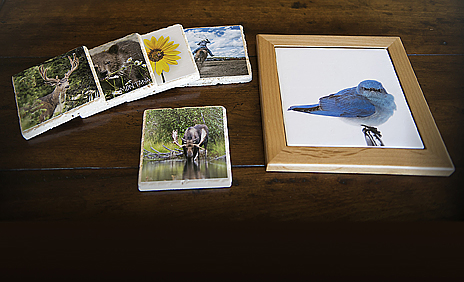
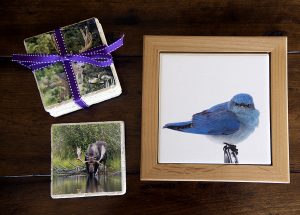
Finding a unique niche in today’s world of photography is not the easiest thing to do. Fortunately, something as simple as making your own coasters, trivets or hanging wall decorations using inexpensive tile, Mod Podge and Red River photo papers is an easy yet wonderfully creative way to share your photography.

STEP 1. Print your photos on the Red River paper of your choice, either in groups or one at a time.
I begin by sizing my images to fit the stone or tile I will be using. For a 4-inch square coaster, I size it to 3.8 inches square. I’m able to place four coaster images onto one 8 1/2 x 11 inch Red River piece of photo paper but you can also print them one at a time. The trivet templates are sized to 5.8 inches square for a 6-inch square tile. I do this, so I can have a slight edge of tile around each image.
I print the images using my Epson SureColor P800, set to the proper color profile for the paper I am using. However if you don’t use profiles, not to worry; any printing method you use will be fine.
I’ve made my coasters using many of the different photo papers that Red River has to offer. I started out with the Red River Inkjet Photo and Fine Art Sampler, a selection of more than 16 different types of papers, which was a great way to find out what I liked and what worked best. My favorite paper is the 66lb Polar Pearl Metallic, but I found that all of the papers worked great. The 60lb River Linen 2.0 gives a nice textured look, whereas the 66lb Arctic Polar Satin had a nice smooth look to it. (See “Links To Resources” below for more information about these paper products.)

STEP 2. Here are the materials you’ll need.
Using a paper trimmer to cut out my photos, I then set up my studio to make the coasters and trivets. Materials needed are Mod Podge, available from your local craft store, a 1″ foam brush, a 4″ rubber brayer (roller), and paper towels. Mod Podge is available in many sizes, from 2-ounces up to one gallon. I used matte but it’s also available in gloss, super gloss, sparkle, and outdoor formulas so there’s plenty of room for experimentation.

STEP 3. Coat the stone or tile with Mod Podge.
You don’t need a lot of Mod Podge per coaster, and a 16-ounce bottle will make a lot of photo tiles. The 4×4 tiles I use are tumbled stone, and the 6×6 tiles for trivets and wall decorations are ceramic tiles, all purchased from my local home supply store (Home Depot or Lowes). While not necessary, I also like to wear latex gloves to keep my hands clean. You may also wish to cover your work area with newspaper or plastic, to protect it from the Mod Podge.
Making one coaster or trivet at a time, I coat the tile with Mod Podge, using a foam brush. I like to put enough on so that when I place the photo on the tile, I can slide it around a bit to position it in place.

STEP 4. Remove bubbles from under the photo.
I then use a brayer to flatten the image and push any air bubbles out from underneath. Always try to roll in the same direction so that any bubbles will be completely removed and not just redistributed.
It is important to hold the photo in position when using the brayer, because if it moves, it will be difficult to re-position it.

STEP 5. Coat the photo with Mod Podge.
After about 15 minutes, I then place another coat of Mod Podge on top of the photo, making sure that the image is coated well, and that the edges of the photo are secure to the tile. Your image will look white, but the Mod Podge dries clear.
After the top coat of Mod Podge, it is time to let the tile dry. Do not be tempted to touch up the tile as it is drying, as you may end up with an uneven surface on your tile. When the weather is warm, I like to allow the tiles to dry outside in the sun. Drying time is dependent on the temperature and humidity but 24 hours is usually sufficient

STEP 6. After the photo dries, spray it with sealer. Here, four tiles are being sprayed at the same time. This waterproofing step is very important.
Once the coaster tiles are dry, I spray them with a clear finish protectant (Krylon Crystal Clear Protective Finish), which helps to protect against staining. I then apply a 3.75″ x 3.75″ adhesive cork that I get from the Aetna Felt Corporation to the back, stamp my business name and info onto the cork, and they are done! (NOTE: You may want to use a simple face mask to avoid inhalation of fumes.)
For the trivets, I found wood trivet frames through Dick Blick an online art supply store which are perfect for the 6-inch square ceramic tiles. These are especially nice because they have a drilled hole in the back for hanging, and rubber pads on the bottom. If you are going to use the trivet as a decorative art piece, you are finished. Just glue it to the trivet frame with a wood glue, such as Elmer’s.
However, trivets that are going to be used for hot pots and pans require an extra step to make them heat-resistant. When the image fused to the trivet tile with Mod Podge has dried, I apply three coats of a fast-drying, oil-based, polyurethane such as Varathane or Minwax which are available from home supply stores as a spray or liquid in gloss or matte finish.
My favorite finish is “clear satin” but others may work as well with different kinds of images. A spray can is very inexpensive so there’s plenty of opportunity to experiment. Be sure to follow the manufacturer’s instructions which usually recommend two to four hours between coats depending on the temperature and humidity. After the last coating, I usually allow between 24-48 hours for a permanent set.

There are several methods you can use to display larger tiles. One that I have mentioned is to simply hang the trivet which is already framed by its border. For bare tiles, you can use some double-sided, removable sticky tape (from your local craft or home supply store) but it may mar your wall (or even take off paint) when removed so read the instructions carefully.
A better option might be to get some tile hangers for wall display or tile easels, some of which just self-stick to the back of the tile allowing you to place your work on shelves or lamp tables. (See Links To Resources below.) Or you can simply frame them if you wish.
Creating coasters and trivets using my own photography and creativity has given me a new way to share my photography as functional art. The sky is the limit on what I can do with Red River Papers and Mod Podge, and it has been a lot of fun experimenting with this process!
[All photos and photos within photos © Christine Pentecost]
LINKS TO RESOURCES
Aetna Felt Corporation [aetnafelt.com] Adhesive cork for backing coasters.
Dick Blick [dickblick.com] Trivet frames for tiles.
National Art Craft [nationalartcraft.com] Tile hangers, frames and self-stick easel backs.
Elegance In Easels [easels.com] Tile display easels and holders.
LINKS TO PAPERS USED
Red River 66lb Polar Pearl Metallic
Red River 60lb River Linen 2.0
Red River 66lb Arctic Polar Satin
ABOUT THE AUTHOR
Christine Pentecost is a Red River Pro who lives in Bozeman, Montana. Using many of her wildlife images, she produces cards, coasters and tile trivets that are sold at gift shops in her area and on the web. Visit her web site and also read her Red River Pro profile. You may also be interested in reading Cash In On Greeting Cards! in which her work is featured along with other card-makers.
Original Publication Date: September 28, 2016
Article Last updated: September 28, 2016
Related Posts and Information
Categories
About Photographers
Announcements
Back to Basics
Books and Videos
Cards and Calendars
Commentary
Contests
Displaying Images
Editing for Print
Events
Favorite Photo Locations
Featured Software
Free Stuff
Handy Hardware
How-To-Do-It
Imaging
Inks and Papers
Marketing Images
Monitors
Odds and Ends
Photo Gear and Services
Photo History
Photography
Printer Reviews
Printing
Printing Project Ideas
Red River Paper
Red River Paper Pro
RRP Products
Scanners and Scanning
Success on Paper
Techniques
Techniques
Tips and Tricks
Webinars
Words from the Web
Workshops and Exhibits
all
Archives
December, 2024
November, 2024
October, 2024
September, 2024
August, 2024
July, 2024
June, 2024
May, 2024
April, 2024
more archive dates
archive article list


