What Rembrandt Taught Me About Portrait Lighting
By Joel Grimes–
Part of the requirements for receiving a BFA in Photography from the University of Arizona included half a dozen semesters of art history.At the time I felt like this was overkill and was only interested in attending my photo-related classes.
In hindsight, one of the greatest influences that shaped my personal vision as a photographer did not come from studying the work of the master photographers, but that of a master painter.

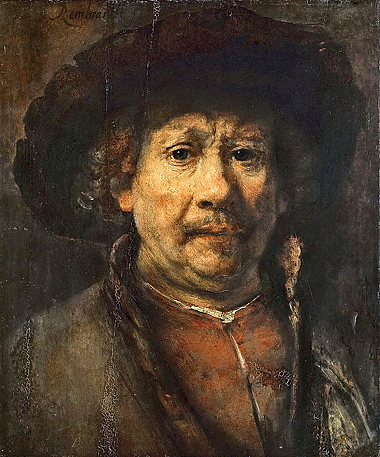
Rembrandt, Self Portrait, 1652. Courtesy of the Kunsthistorisches Museum, Vienna, Austria.
The first art history class I attended was an intense overview starting with the primitive caveman etchings, through to the present day.
When we studied the 17th Century Baroque and Renaissance painters, I was captivated by their use of light– in particular, Rembrandt’s use of light falling across his subjects.
If you look closely at his portrait work you will see that the cheek opposite the light source produces a triangle highlight just under the eye. This is due to the roundness of the cheek and the shape of the nose catching the light as it crosses the face. This is what has been coined the “Rembrandt Triangle”.
A few years ago I got to see one of Rembrandt’s original paintings titled, Self Portrait 1652, hanging in the Kunsthistorisches Museum in Vienna. I stood there for at least 45 minutes studying that image.
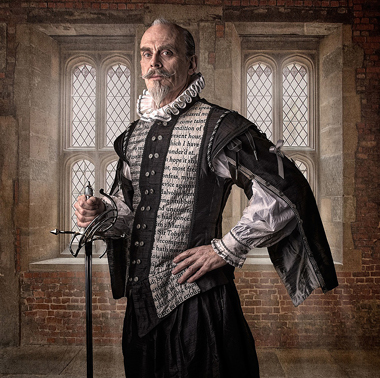
It took years before I realized how much influence Rembrandt was to have on my images. But with my very first portraits, I set out to emulate this look. To this day, this cross light Rembrandt effect is still one of the most appealing ways in which to shoot a portrait.

Portrait of Russell Brown. © Joel Grimes
To achieve this cross light Rembrandt effect, we start with a soft box bank that I run horizontally. I normally use a medium bank with a strobe light for one or more subjects but this technique can be used with hot lights as well. Currently my medium bank of choice happens to be a 3′ x 4′ Westcott, but I’ve also used banks from other manufacturers. The important thing is make sure it has the inner baffle attached. Also, all my banks are white inside as opposed to silver.

1. This 45-desgree lighting set-up will not produce a genuine Rembrandt lighting effect.
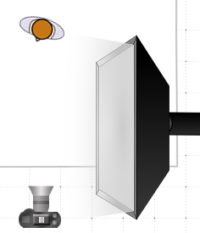
As you can see in Diagram 1, I have illustrated how not to position the bank. Most photographers are taught to position the bank pointing 45 degrees to the subject. This will give a nice soft light, but fails to really emphasize the Rembrandt effect. The light traveling to the subject is pretty much hitting the face equally with a minimal wrapping around effect.

2. With the light oriented the same way in relation to the subject, moving it toward or away from the background will alter the effect. You can also try posing the subject at different angles to the light.
In Diagram 2 you can see that the bank is placed 90 degrees to the subject. This creates a much smother-gradated effect. The light coming from the far end of the bank has a further distance to travel, thus making its value less as it reaches the far side of the cheek. This will give a much greater wrap-around and a more pleasing effect.
To fine-tune the Rembrandt triangle on the cheek, move the bank along the lens axis towards or away from the backdrop. Moving it closer to the backdrop decreases the effect. Moving it further away from the background increases it. Also keep in mind that the darker the skin value the more you have to emphasize the effect. I try and keep the bank as close to the subject as I can, but am often limited by how wide a lens I may be using.

3. The light inside the soft box has been re-positioned so that it is now closer to the subject. This may require a few modifications but the results are worth it.
I also discovered that by offsetting the light source in the bank, you can achieve an even greater gradation and wrap-around effect. It is important to remember to offset the strobe in the direction of the subject as shown in Diagram 3. All cross lighted images you see here and on my site use the offset light approach but I advise you to start with the basic set-up and, when you have mastered it, then try the offset set-up.
Finally, it is very tempting to place a reflector on the opposite side of the bank to fill in the shadows. However, this will minimize the effect. In fact, if I am in a room that has a white wall opposite the bank, I will place a black cloth or a black piece of foam core between the subject and the wall to absorb the bounce contamination.
Using Rembrandt lighting is an easy way to begin doing portraiture and requires only one light source. With just a little practice you’ll quickly understand the basic principles. Print them as I do on Red River Ultra Pro Satin and your images will be truly stunning.
ABOUT THE AUTHOR
Joel Grimes is a Red River Pro who conducts workshops throughout the U.S.
To see more of his work and find out about his workshops, click here.
RESOURCES
Learn about the best Red River Papers for Portraits
To subscribe to Red River Paper’s newsletter, click here.
Original Publication Date: July 30, 2018
Article Last updated: August 28, 2024
Related Posts and Information
Categories
About Photographers
Announcements
Back to Basics
Books and Videos
Cards and Calendars
Commentary
Contests
Displaying Images
Editing for Print
Events
Favorite Photo Locations
Featured Software
Free Stuff
Handy Hardware
How-To-Do-It
Imaging
Inks and Papers
Marketing Images
Monitors
Odds and Ends
Photo Gear and Services
Photo History
Photography
Printer Reviews
Printing
Printing Project Ideas
Red River Paper
Red River Paper Pro
RRP Products
Scanners and Scanning
Success on Paper
Techniques
Techniques
Tips and Tricks
Webinars
Words from the Web
Workshops and Exhibits
all
Archives
January, 2025
December, 2024
November, 2024
October, 2024
September, 2024
August, 2024
July, 2024
June, 2024
May, 2024
more archive dates
archive article list


