Framing Up with a Vignette by Tim Grey
Framing Up with a Vignette
By Tim Grey
For the Red River Paper Blog
 I’ve always found the notion of putting a frame around a piece of art to be somewhat interesting. After all, if the art is so great, why do we need to put a fancy frame around it? Eventually I realized that the frame served a purpose, effectively providing a window into the world of that piece of art, and helping to set a visual boundary.
This concept of literally framing up an image also applies to what you might think of as a virtual frame by way of a vignette effect.
A natural darkening of the edges in an image can be caused by light fall-off with a wide-angle lens, but of course you can add a vignette effect after the capture as well.
When the edges of a photo are darkened just a little bit, you can create an effect where the viewer tends to stay focused within the image. Our eyes tend to move toward the brighter areas of a scene, and a slightly darkened edge serves as something of a barrier so our eye tends not to wander outside the frame.
Taken to more of an extreme, a vignette effect can create something of a “tunnel vision” appearance that can produce a very dramatic result.
It is also worth noting that a vignette doesn’t always have to mean darkening the edges of the photo. You can also lighten those edges, helping to create a more seamless transition to the blank page, for example, so that a relatively light photo seems to fade into oblivion.
My personal tendency is to not use a vignette effect too often. And when I do, I will most often create a relatively subtle effect. However, there are also times when I want the vignette to contribute a strong element to the photo.
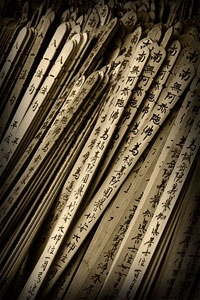
A good example was a photo of prayer sticks I captured in Japan. I had already converted the image to black and white and added a sepia-tone effect, in an effort to convey a sense of the timelessness of the scene and the experience I had while photographing the scene. But that wasn’t quite providing the strong mood I was after.
In most cases I will utilize the controls in Lightroom’s Develop module to apply a creative vignette to my images. In this case, however, I needed to exercise a bit more control. So in Photoshop I used an exaggerated dodge and burn technique to paint with light (and dark) onto the image, creating a somewhat random pattern of darkening along the outer edges of the image.
 It seems to me photographers in general spent years lamenting the fact that certain lenses produced an unwanted vignette effect. Perhaps that’s why it seems so many photographers overlook this effect, which can help frame up a photo and create a greater sense of drama. I encourage you to keep in mind that adding a vignette effect, whether to darken or lighten the edges of a photo, is an option, and perhaps give it a try from time to time. You just may find it improves the impact for some of your photos.
—
Tim Grey publishes the free Ask Tim Grey eNewsletter (www.asktimgrey.com), where he answers questions from photographers on a wide range of subjects. He also publishes the Pixology electronic monthly magazine (www.pixologymag.com), produces a wide variety of video training courses, and speaks at events around the world.
Original Publication Date: March 28, 2013
Article Last updated: March 28, 2013
Related Posts and Information
Categories
About Photographers
Announcements
Back to Basics
Books and Videos
Cards and Calendars
Commentary
Contests
Displaying Images
Editing for Print
Events
Favorite Photo Locations
Featured Software
Free Stuff
Handy Hardware
How-To-Do-It
Imaging
Inks and Papers
Marketing Images
Monitors
Odds and Ends
Photo Gear and Services
Photo History
Photography
Printer Reviews
Printing
Printing Project Ideas
Red River Paper
Red River Paper Pro
RRP Products
Scanners and Scanning
Success on Paper
Techniques
Techniques
Tips and Tricks
Webinars
Words from the Web
Workshops and Exhibits
all
Archives
January, 2025
December, 2024
November, 2024
October, 2024
September, 2024
August, 2024
July, 2024
June, 2024
May, 2024
more archive dates
archive article list


